Getting ready to reopen your restaurant? Reorganize your walk-in first

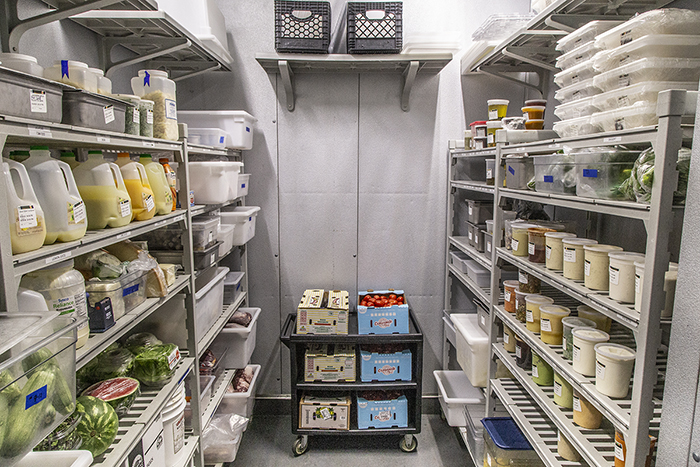
 Store ready-to-eat foods that aren’t going to be cooked or cooked any further, like produce, salads, dairy, dessert and baked goods, and cooked meats, above raw foods. (Photo courtesy of Cambro Mfg.)
After months of either being closed or operating a takeout-and-delivery model only, now is a great time to organize your storage areas, especially your walk-in refrigerator.
There is a best way to organize the contents of your cooler and following them can cut food costs, reduce waste, save labor, and most importantly, reduce the risk of foodborne illness. Here's how:
Separate raw from prepared or ready-to-eat foods. This will help minimize the risk of cross-contamination. If you can dedicate one vertical rack to prepared foods and another to raw items, that’s a good plan. But if you need to store a variety of items on a single vertical shelving unit, there’s a safe order top to bottom.
Ready-to-eat foods that aren’t going to be cooked or cooked any further such as produce, salads, dairy goods (milk, yogurt, cheese, butter), dessert and baked goods, and cooked meats should all be stored above raw foods.
After that, items with the lowest minimum cooking temperatures should be stored above items with higher minimum finished cooking temperatures. So, fish that requires cooking to 145°F should store above chicken that needs to reach 165°F.
The top-to-bottom order is:
- Top shelves – prepared and ready-to-eat foods that will not be cooked at all or cooked further
- Next down – fish/seafood
- Next down – whole cuts of raw beef and pork
- Next down – ground raw beef and pork
- Bottom shelf – raw poultry
Download our Restaurant Reopening Guidance
Floors and ceilings: All food needs to be at least six inches off the floor. You can use dunnage and keg racks or even plastic milk crates. Wood pallets are out. Make sure to keep a 12-inch clearance from the ceiling.
Containers: There’s no rule of thumb when it comes to leaving foods in their original shipping boxes vs. removing them and placing them into secondary containers, outside of standard labeling requirements. But many operators prefer to transfer goods into stainless steel and/or clear plastic containers. Clear containers make it easier to identify contents. Any container you use should be NSF-certified, and make sure to transfer any ingredient lists to identify allergens, preparation instructions, and to include both the date in and use-by on the label.
Covers: Cover containers so they can’t spill or be spilled on by other items in storage. Most walk-in containers come with lids, but plastic wrap works fine on open-top containers and pans.
Labeling: Labels on containers should include the type of food and the date when it was placed in storage and the date it needs to be used by. Remember FIFO, first in, first out; when new shipments come in, place the new arrivals behind the older goods on the shelf. With the space you have, separate items as much as possible for good air circulation.
Check Temperatures. The temperature of your walk-in should be between 34°F and 38°F. Since water's freezing point is around 32°F, you don't want the temperature to drop to that point. Check temps at least once a day to make sure the system is working properly.
Because refrigerator temperatures fluctuate, especially in busy foodservice environments, keep the door closed; don’t prop it open. Place one thermometer near the door, where it is warmest, and another in a central location inside the unit. Put meats, poultry and dairy toward the back of the cooler, produce closest to the door. Most importantly, monitor and record the temperatures daily with a chart on the unit.
Install proper lighting. Lights have to be a specific spec per regulations; the health inspector will check this regularly. Though brightness requirements for the walk-in lighting are lower than for other areas of the restaurant, it should allow employees to read labels, and spot items pushed into corners where they can get overlooked. Lighting fixtures need to be shatter-resistant or enclosed in a proper commercial shield so glass can’t get into food if the light shatters.